Saturday morning I was informed that we were soon to recieve a shipment of 20 peonie plants that are to be divided into 80 plants. Since we now have "dirt" we can also anticipate the re-location of existing peonies from another site here in the valley - probably another 15 plants that will be divided into another 60 plants.
Lots of peonies.
We need a space to put them. A temporary space on the new site.
The challenge is to put them somewhere that will be minimally impacted by the construction we are anticipating in the spring. A bit of a tough issue as we have not really started the design, although I do have and idea of where things are, and that we need to prepare to install utility conduits to different structures on site from a central supply point.
All this to say that the first shovels of dirt were turned Sunday morning to being to prepare the site to recieve new plant material. Peonies.
To be fair, peonies are not the only plants we will have. We have saved seeds from columbine, penstemmon, lupine and other plants. There will be native color on site as well as a few colorful companions.
The first pile of dirt we tackled was against the garage. We sifted the dirt to remove roots, gravel and other undesireable material prior to stockpiling the dirt in the sandbox to mix the sand in with the dirt as well as soil ammendments.
We used a heavy gage 1/2" x 1/2" galvanized screen mesh stapled to frames. The frames were made from studs harvested from the trailer we are de-constructing and the screen mesh was attached to frames with staples I removed from the aluminum panels that were attached to the trailer that were re-cycled. Sustainable re-use of materials.
It is always significant when the gardening starts. It marks the beginning of the reclamation of the site and comes with a fun anticpation of what we can do with this site. Gardens, plants, vegetable raised beds and a lot more....to come.
The shovels, pitch forks, rakes and even the roto-tiller will be put to good use.
The peonies cometh.
Wednesday, August 22, 2012
THE SITE 1.0: The Peonies Cometh
Saturday morning I was informed that we were soon to recieve a shipment of 20 peonie plants that are to be divided into 80 plants. Since we now have "dirt" we can also anticipate the re-location of existing peonies from another site here in the valley - probably another 15 plants that will be divided into another 60 plants.
Lots of peonies.
We need a space to put them. A temporary space on the new site.
The challenge is to put them somewhere that will be minimally impacted by the construction we are anticipating in the spring. A bit of a tough issue as we have not really started the design, although I do have and idea of where things are, and that we need to prepare to install utility conduits to different structures on site from a central supply point.
All this to say that the first shovels of dirt were turned Sunday morning to being to prepare the site to recieve new plant material. Peonies.
To be fair, peonies are not the only plants we will have. We have saved seeds from columbine, penstemmon, lupine and other plants. There will be native color on site as well as a few colorful companions.
The first pile of dirt we tackled was against the garage. We sifted the dirt to remove roots, gravel and other undesireable material prior to stockpiling the dirt in the sandbox to mix the sand in with the dirt as well as soil ammendments.
We used a heavy gage 1/2" x 1/2" galvanized screen mesh stapled to frames. The frames were made from studs harvested from the trailer we are de-constructing and the screen mesh was attached to frames with staples I removed from the aluminum panels that were attached to the trailer that were re-cycled. Sustainable re-use of materials.
It is always significant when the gardening starts. It marks the beginning of the reclamation of the site and comes with a fun anticpation of what we can do with this site. Gardens, plants, vegetable raised beds and a lot more....to come.
The shovels, pitch forks, rakes and even the roto-tiller will be put to good use.
The peonies cometh.
Wednesday, August 15, 2012
The Trailer 1.4: The Skeletal Remains
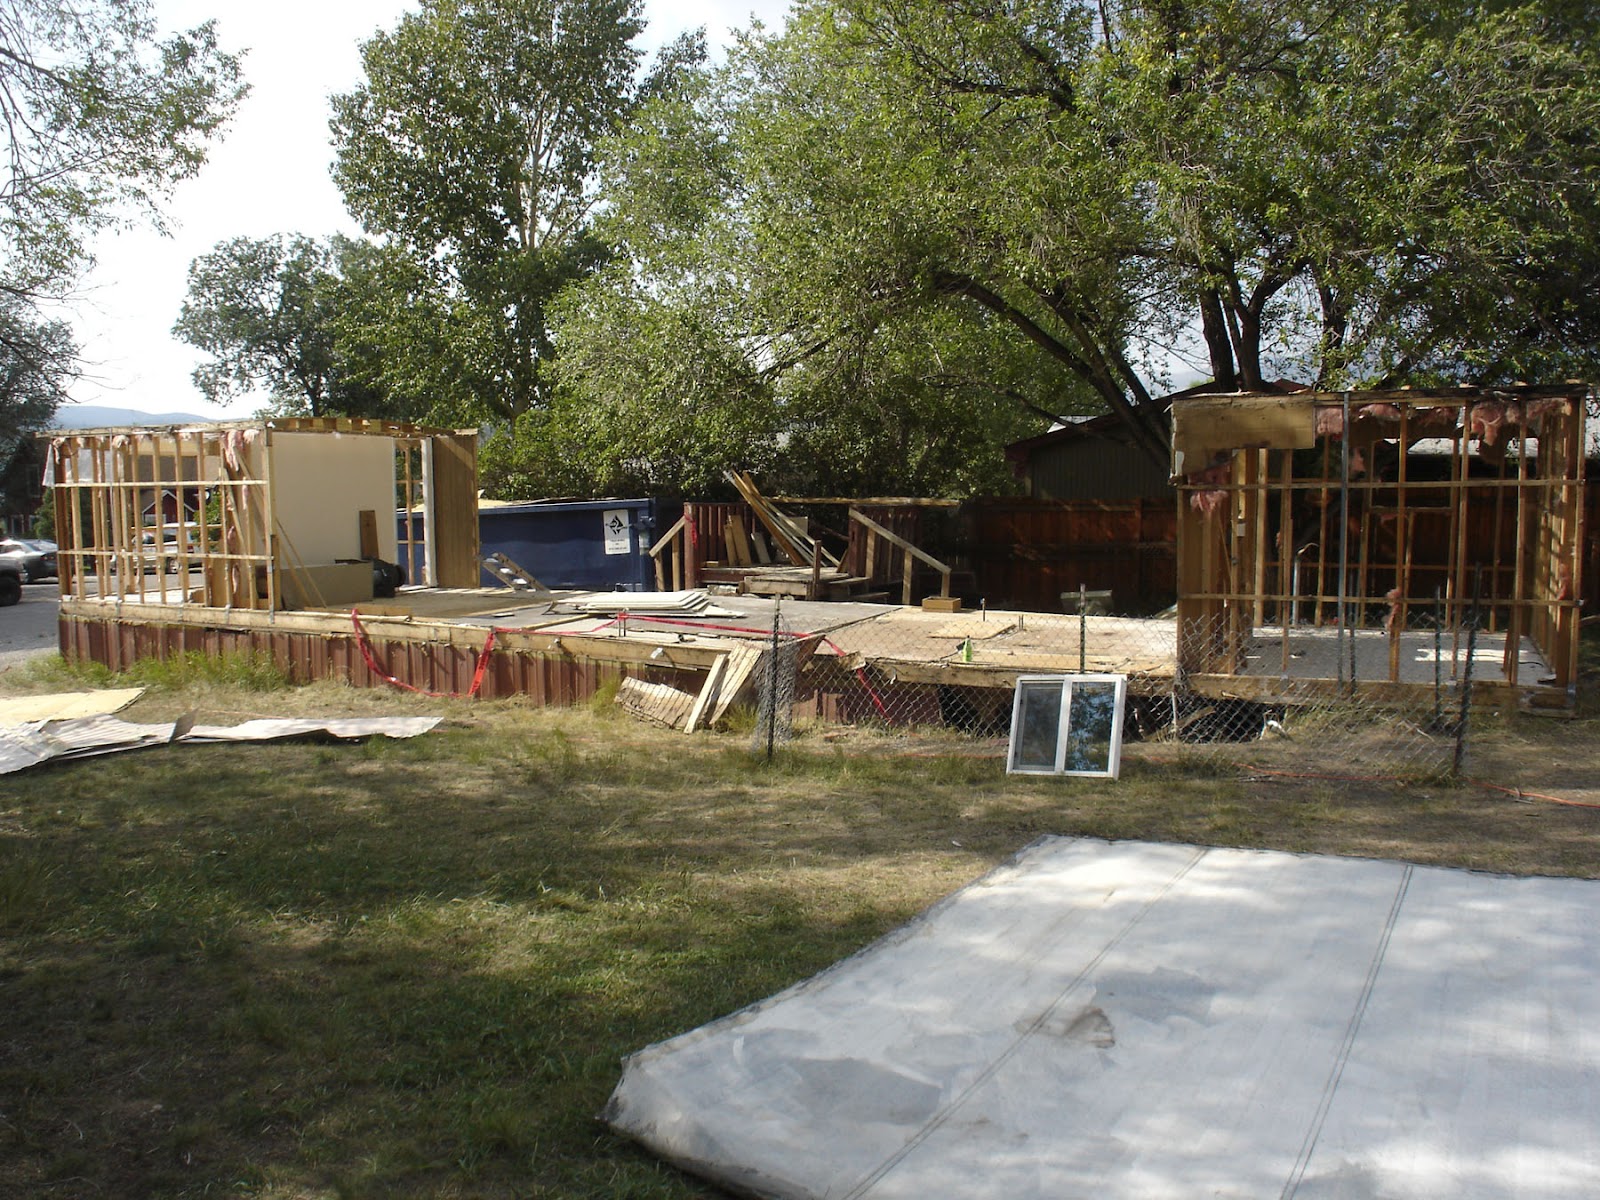 |
| End of day - August 12, 2012 |
"... This reminds me of what a beached whale looks like after the sharks have had their turn, plus the wolves and polar bears on shore. A little skeleton left."
The dumpster is essentially full. The remaining studs will more than likely be cleaned up and placed in the materials inventory for future use on site.
In removing the skin of the trailer I have saved some aluminum trim shapes that will make great gutter profiles for the edge of the lean to to help channel rain water into the new garden area.
The studs should be down during the course of the week or Saturday at the latest.
Then the fun begins.
The safety gear is being acquired in order to begin to clean out the underside of the trailer deck. We have no idea what is under the trailer. Only part of the skirt has been removed and what was in there was NASTY! With concerns for rotten wood, black mold and the remains of the nests of mice and other such great considerations...I don't want to breath that stuff.
So, goggles, a respirator that filters organic compounds and probably a disposable tyvek overall will be employed until such time as we have - to our satisfaction - cleaned underneath the trailer...including the removal of the deck.
The deck will come out in sections. I have a new demo blade for the skillsaw that is eager to tackle the floor assembly. There is one area of the floor assembly that is in the former bathroom area that is really soft - indicating some pretty rotten substructure underneath. Judging from what I found in the walls of the bathroom - not surprised.
So...we will bring in another smaller dumpster...get the floor deck out and expose the steel and move to other fun issues with the project.
I'll provide a synopsis of materials weight here soon.
Final note...this project has generated a significant amount of thirst this summer. The bottles containing adult fermented beverages have been insulated with bottle covers from my friends at CAD-1. In the "shameless promotion" category I submit the photo below in gratitude for helping keep the beverages cool after hot days on a dirty job site.

The Trailer 1.4: The Skeletal Remains
|
| End of day - August 12, 2012 |
"... This reminds me of what a beached whale looks like after the sharks have had their turn, plus the wolves and polar bears on shore. A little skeleton left."
The dumpster is essentially full. The remaining studs will more than likely be cleaned up and placed in the materials inventory for future use on site.
In removing the skin of the trailer I have saved some aluminum trim shapes that will make great gutter profiles for the edge of the lean to to help channel rain water into the new garden area.
The studs should be down during the course of the week or Saturday at the latest.
Then the fun begins.
The safety gear is being acquired in order to begin to clean out the underside of the trailer deck. We have no idea what is under the trailer. Only part of the skirt has been removed and what was in there was NASTY! With concerns for rotten wood, black mold and the remains of the nests of mice and other such great considerations...I don't want to breath that stuff.
So, goggles, a respirator that filters organic compounds and probably a disposable tyvek overall will be employed until such time as we have - to our satisfaction - cleaned underneath the trailer...including the removal of the deck.
The deck will come out in sections. I have a new demo blade for the skillsaw that is eager to tackle the floor assembly. There is one area of the floor assembly that is in the former bathroom area that is really soft - indicating some pretty rotten substructure underneath. Judging from what I found in the walls of the bathroom - not surprised.
So...we will bring in another smaller dumpster...get the floor deck out and expose the steel and move to other fun issues with the project.
I'll provide a synopsis of materials weight here soon.
Final note...this project has generated a significant amount of thirst this summer. The bottles containing adult fermented beverages have been insulated with bottle covers from my friends at CAD-1. In the "shameless promotion" category I submit the photo below in gratitude for helping keep the beverages cool after hot days on a dirty job site.
Tuesday, August 7, 2012
The Trailer 1.3: The Walls Come Down
 |
Start of Day - Sunday Morning |
Progress has been made. The center section of the trailer has been dismantled.
The removal took a bit of a different turn than initially expected. The initial removal concept was to start at one end and move to the other. However, upon considering the existing structure, which is fairly minimal and realizing the 1/8" plywood paneling (luan board) was probably a structural diaphragm, removing the walls took a different turn.
To me, it made more sense to remove the central part of the structure because it was essentially open space, had less holding it together than the two rooms at either end which could support themselves independently. And that is what was done.
The removal sequence was:
1 Remove all the interior trim, fixtures;
2 Remove the three walls separating the bathroom from mechancial / laundry and
kitchen.
3 Remove the interior ceiling, insulation and vapor barrier.
4 Remove the galvanized metal roof.
5 Remove the interior wall materials (gyp wall board, luan board and insulation)
6 Remove the windows.
7 Remove the aluminum trim and skin. (At this point all that is left are the studs and roof
trusses).
8 Remove the roof trusses and cut sections of the wall and remove them in sections with
the truss removal.

The result...all digits, toes and appendages are intact, nothing fell on the head, and it was a fairly surgical process of deconstruction.
I have yet to take the aluminum to the recycler and will provide a material weight on that. Most screws are saved to be sent to the recycler as were staples....and there are a lot of staples used on the project.
The water heater was drained and removed. Don't know if I will sell it or recycle. It is a relatively new (2010) 40 gallon gas fired water heater. Someone may want it...and selling it will offset the dumpster cost.
The dumpster is at least 3/4 full at this time.
It was a long day of work on Sunday and rather than pull screws from the studs...they went into the dumpster...and some of the studs were pretty rotten. I was tired.
We opened up a new view to the beautiful old tree on the North side and more will be revealed in the next two weeks.
At some point I will post the construction section of the trailer. It is interesting to note how minimally constructed the trailer was...and how long it lasted.

End of day - Sunday
The Trailer 1.3: The Walls Come Down
|
Start of Day - Sunday Morning
|
Progress has been made. The center section of the trailer has been dismantled.
The removal took a bit of a different turn than initially expected. The initial removal concept was to start at one end and move to the other. However, upon considering the existing structure, which is fairly minimal and realizing the 1/8" plywood paneling (luan board) was probably a structural diaphragm, removing the walls took a different turn.
To me, it made more sense to remove the central part of the structure because it was essentially open space, had less holding it together than the two rooms at either end which could support themselves independently. And that is what was done.
The removal sequence was:
1 Remove all the interior trim, fixtures;
2 Remove the three walls separating the bathroom from mechancial / laundry and
kitchen.
3 Remove the interior ceiling, insulation and vapor barrier.
4 Remove the galvanized metal roof.
5 Remove the interior wall materials (gyp wall board, luan board and insulation)
6 Remove the windows.
7 Remove the aluminum trim and skin. (At this point all that is left are the studs and roof
trusses).
8 Remove the roof trusses and cut sections of the wall and remove them in sections with
the truss removal.
The result...all digits, toes and appendages are intact, nothing fell on the head, and it was a fairly surgical process of deconstruction.
I have yet to take the aluminum to the recycler and will provide a material weight on that. Most screws are saved to be sent to the recycler as were staples....and there are a lot of staples used on the project.
The water heater was drained and removed. Don't know if I will sell it or recycle. It is a relatively new (2010) 40 gallon gas fired water heater. Someone may want it...and selling it will offset the dumpster cost.
The dumpster is at least 3/4 full at this time.
It was a long day of work on Sunday and rather than pull screws from the studs...they went into the dumpster...and some of the studs were pretty rotten. I was tired.
We opened up a new view to the beautiful old tree on the North side and more will be revealed in the next two weeks.
At some point I will post the construction section of the trailer. It is interesting to note how minimally constructed the trailer was...and how long it lasted.
End of day - Sunday
Wednesday, August 1, 2012
RESIDENCE: 1.0 The Program v. The Car
We started thinking about the residence. My wife has the questionnaire I generally publish for a new client when beginning a project...it is thorough.
Among the initial thoughts and criteria are cost (of course) which then gets to size of home (SF) and other issues like one story or two (we ain't gettin' any younger!)...views, relationship of inside to outside, entry...etc.
There was one statement that I thought was particularly interesting in the discussion. When we started discussing an area for vehicles my wife exhibited some rather strong disdain for having to dedicate space to "cars". The question was essentially...why do we create so much space for cars? Why do we create huge doors for cars? Why shouldn't cars be off to the side somewhere so we can focus on the important elements...the places where we live?
Pretty good questions!
So we will explore the question.
Our particular site affords us some interesting options in that we have two ways to get into the site, plenty of parking, and don't necessarily need a garage.
It is, however, nice to have a space that is protected from the howling gales and blizzards which we do get in these parts, and it is not a whole lot of fun to schlep groceries into the house in a raging snow or rain storm. That having been said...why pay such homage to something that is really a functional item, not necessarily aesthetic. (Not that a Porsche is not an aesthetic masterpiece...it is...I don't own one though, so don't plan to exhibit my vehicle as such.)
One thought that came to the table that I thought was also interesting and it was the thought of working to integrate the interior space with the outdoor space to encourage a gracefull flow between indoor and outdoor spaces to promote outdoor living. Our site is a natural for this concept.
Gardening, outdoor eating, separation of studio, guest and living spaces, garage art spaces...all work as a total outdoor complex.
On a side note:
The tarps come off the trailer this weekend and the walls start coming down...time to fill the dumpster.
Subscribe to:
Comments (Atom)

